
Nikon Z8 & Z9 bird-in-flight AF settings: The complete setup guide
The exact bird-in-flight AF settings we use on the Nikon Z8 — release priority, Bird subject detection, lock-on, AF handoff, and button programming, step by step.
This post contains affiliate links. We may earn a commission if you make a purchase, at no extra cost to you. As an Amazon Associate, Dadnology earns from qualifying purchases.
📷 This guide is part of our Nikon Brand Hub — every Nikon Z body and lens we’ve tested, from wildlife glass to landscape and family photography kits.
Bird-in-flight photography is the discipline that separates a camera’s autofocus marketing from its real-world capability. A bird crossing the sky at speed, against a complex background, changing direction without warning — this is the hardest thing you can ask an AF system to do. The good news is that the Nikon Z8 (body) and Z9 are exceptional at it. The better news is that their out-of-the-box settings are not optimised for it, and a handful of changes transform the experience.
These are the settings we actually use. They’re adapted from Steve Perry’s excellent tutorial, Nikon Z8 & Z9: BEST Bird-In-Flight Autofocus Settings, and refined through our own time in the field — and they pair directly with the gear in our Nikon Z birding setup guide. If you shoot birds with a Z body, this is the configuration that will lift your keeper rate immediately.
A quick note before we start: the video is built around the Z8 and Z9, but the Z50II shares the same EXPEED 7 processor. Almost all of these settings carry over to it directly — the main differences are in button programming and a few Z8-specific firmware features, which we flag as we go.
1. Core AF menu settings
These four menu settings are the foundation. Get them right once and you rarely touch them again.
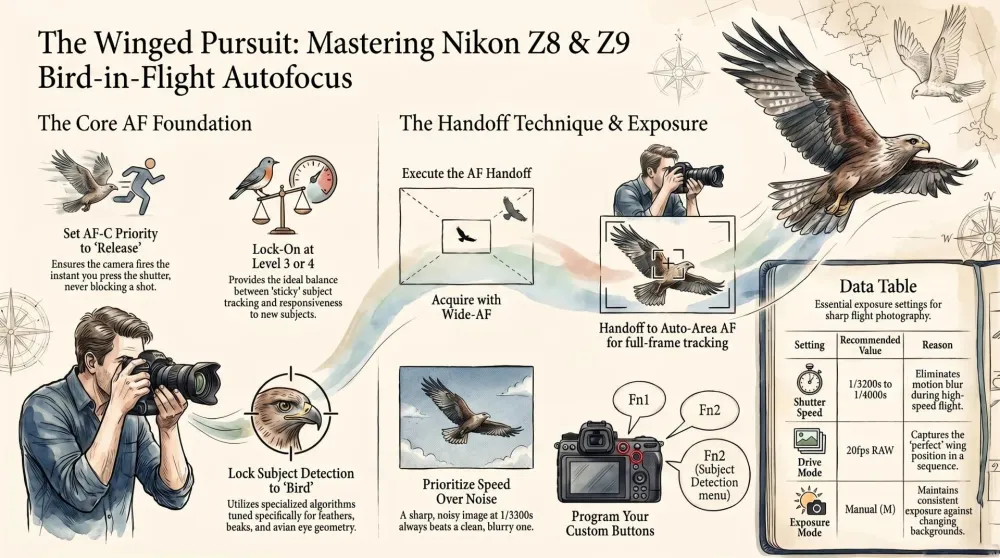
AF-C Priority Selection: set to Release. This is the single most important setting for birds in flight. With priority set to Release, the camera fires whenever you press the shutter — even if it can’t 100% confirm focus in that split second. Set to Focus, the camera blocks the shutter when it isn’t certain, which means it locks up at exactly the moment a bird hits the perfect wing position. For flight photography, you want every frame the burst can give you. Modern subject detection keeps the hit rate high even with release priority, so you’re not trading away sharpness — you’re just removing a shutter blockage you don’t want.
Focus Tracking with Lock-On: set to 3 or 4. This controls how “sticky” the focus stays on your subject when something briefly interrupts it. A higher value holds focus on the bird if a branch or another bird crosses the frame for an instant. A lower value reacts faster to genuine subject changes but also jumps to the background more readily. A value of 3–4 is the practical middle ground. One important caveat: when subject detection is active, this setting has only a minimal effect — it matters far more when you’re shooting without detection.
Focus Point Persistence: leave on Auto. This allows seamless AF handoffs between different focus points and area modes — which is central to the handoff technique we cover below. Auto is the correct setting; don’t override it.
Manual Focus Ring in AF Mode: set to On. This lets you grab the focus ring on the lens at any time, even in autofocus mode, to pre-focus to roughly the right distance. For birds in flight, pre-focusing to the bird’s approximate distance helps the AF system lock on instantly rather than hunting from infinity. Leaving this on costs you nothing and gives you a manual override whenever you need it.
2. Subject detection: Set it to “bird”
For bird photography, lock subject detection to Bird and leave it there. The dedicated bird-detection network is tuned for feathers, beaks, and avian eye geometry, and it finds bird eyes in situations where the generic animal mode would lock onto body mass instead.
How to know it’s working: a small green box appears in the viewfinder over the detected subject. That’s the system telling you it has found and locked the bird. If instead the entire large AF field lights up, detection is not currently engaging — the camera has fallen back to standard area AF.
When to turn it off: if the camera keeps focusing on the bird’s body instead of its head, you’ll get more reliable results by switching subject detection off and using a classic AF area like Wide-S, placing the small box on the bird’s head yourself. Detection is a tool, not a religion — when it fights you, override it.
Technique matters more than you’d think: subject detection works noticeably better when you pan smoothly and keep the bird near the centre of the frame. A jerky, off-centre pan gives the detection algorithm less to work with. The calmer and more precise your tracking, the more reliably the green box stays locked on the eye.
3. AF Area modes and the handoff technique
Always shoot AF-C (continuous autofocus) for anything that moves. This isn’t optional for flight — single-servo AF can’t track a moving subject.
Beyond that, the modern workflow has shifted thanks to firmware updates and the strength of the bird-detection mode:
Auto-Area AF as the default. With current firmware and Bird detection, Auto-Area AF has become the go-to for many flight situations — the camera finds the bird anywhere in the frame and locks on. The key is pre-focusing to roughly the bird’s distance so the system grabs it immediately instead of hunting. The one situation where Auto-AF struggles is a frame with many birds, where focus can jump between subjects unpredictably. In a busy flock, switch to a more constrained mode.
Wide-AF (Large or Small) to restrict the focus area. When there are distracting elements in the foreground or background — reeds, branches, a busy shoreline — a Wide-AF area lets you confine the focus search to the part of the frame where the bird is, preventing the camera from latching onto clutter.
The AF-handoff technique is the workflow that ties it together, and it’s worth practising until it’s instinctive:
- Acquire the bird with a Wide-AF area — it’s the easiest mode to get initial lock on a moving subject.
- Hand off by pressing a programmed function button (e.g. Fn1) to switch to Auto-Area AF (or 3D-tracking), which then follows the bird across the entire frame.
- If subject detection drops out mid-flight, Auto-AF re-acquires the bird across the whole viewfinder more reliably than the very small 3D-tracking box does.
This combination — easy acquisition with Wide-AF, full-frame tracking with Auto-AF on a button — is the heart of a high keeper rate on flight shots.
4. Button programming: The setup that makes it fast
The settings above only become fast when the right functions are under your fingers. Here’s the button layout this workflow depends on (Z8/Z9 — see the Z50II note below):
Fn1 → AF Override for Auto-Area AF. This is the handoff button. Hold it to switch to Auto-AF for full-frame tracking, release to return to your base area mode. It’s the button your middle finger lives on during a flight sequence.
Fn2 → “My Menu” top item (Subject Detection). Assign Fn2 to jump straight to the top of My Menu, with subject detection placed there. When detection misbehaves — locking onto a body, or refusing to engage — you can disable or change it in a fraction of a second without diving through the menu system mid-shoot.
AF-ON → Back-Button Autofocus. The classic back-button AF setup separates focus from the shutter, so a half-press never refocuses at the wrong moment. If you’re not already shooting back-button, birds in flight is the discipline that will convert you.
Video-Record Button → “Cycle AF Area Mode” (Z8 with firmware 2.0+ only). This newer function lets you step linearly through your favourite AF area modes — Single-Point, Wide-S, Wide-L, 3D, Auto — with repeated presses. It’s the fastest way to move between modes without taking your eye from the viewfinder.
5. The exposure settings that go with them
Autofocus is only half the equation. These exposure settings complete the bird-in-flight setup:
| Setting | Recommended | Why |
|---|---|---|
| Shutter speed | 1/3200s (1/4000s for beginners) | Arrests wing motion; faster speeds forgive imperfect panning |
| Aperture | Wide open (f/5.6–6.3) | Maximum light + a clean, smooth background |
| ISO | Under 3200 (6400–12800 if low crop) | Sharp-and-noisy beats clean-and-blurry, every time |
| Drive mode | 20fps RAW (maximum) | Catches the perfect wing position in a sequence |
| Exposure mode | Manual (M) | Consistent exposure as the background changes behind the bird |
| ISO control | Lens control ring | Adjust ISO without leaving the shooting position |
The guiding principle behind all of it: a sharp, noisy image always beats a clean, blurry one. Don’t drop your shutter speed to keep ISO low — raise the ISO and keep the bird sharp. Noise can be cleaned up in post; motion blur cannot be undone. Shooting in Manual mode keeps your exposure stable as the bird crosses from bright sky to dark treeline, and putting ISO on the lens control ring means you can react to changing light without lowering the camera.
The Z50II note: What carries over
If you’re shooting the Z50II — as we often do for the extra reach — the good news is that the core of this setup transfers directly, because the Z50II runs the same EXPEED 7 processor as the Z8 and Z9. AF-C release priority, lock-on, focus point persistence, Bird subject detection, the AF area modes, and the entire exposure approach all work the same way.
The differences are physical, not algorithmic. The Z50II has fewer custom buttons than the Z8, so you’ll have to be more selective about which functions you assign — prioritise the Fn button for the Auto-AF handoff and the subject-detection toggle. Some Z8-firmware-2.0 features, like “Cycle AF Area Mode” on the video-record button, may not be present. But the AF performance is genuinely equivalent, so don’t assume the cheaper body gives you a lesser flight-shooting experience. It doesn’t — which is why the Z50II is the body we recommend to anyone getting into birding without a full-frame budget. Paired with the 180-600mm it out-tracks the D500 we sold to make room for it, and the TC-1.4x adds reach on the days the birds stay distant.
Pros
- Release priority means you never miss the perfect wing position to a blocked shutter
- Bird subject detection finds and holds the eye automatically — far higher keeper rate than manual point selection
- The Wide-AF-to-Auto-AF handoff combines easy acquisition with full-frame tracking
- Button programming puts every critical override under your fingers without menu diving
- The same setup transfers almost completely to the Z50II via shared EXPEED 7
Cons
- Release priority will let through some out-of-focus frames — you cull more, but you keep the keepers
- The handoff technique requires practice before it becomes instinctive
- Full button programming is Z8/Z9-centric; the Z50II's fewer buttons require compromises
Conclusion: Dial it in once, shoot birds forever
The Nikon Z8 and Z9 have the autofocus hardware to nail birds in flight — but only once you’ve moved them off their general-purpose defaults. The changes are not complicated: AF-C set to release priority, lock-on at 3–4, Bird subject detection, an AF-handoff workflow on a custom button, and an exposure approach built around a fast shutter and a sharp-over-clean philosophy.
Set it up once, practise the handoff until it’s muscle memory, and your keeper rate on flying birds will climb dramatically. These settings have become second nature for us, and they pair perfectly with the Z8 or Z50II and the 180-600mm in our Nikon Z birding setup guide.
The Final Word: Credit where it’s due — Steve Perry’s tutorial is the clearest explanation of this setup we’ve found, and these are the settings we use every time we head out for birds. Configure them, then go practise on gulls. They’re free, fast, and unfairly good training.
Should AF-C priority be set to Focus or Release for birds in flight?
What lock-on (focus tracking) value is best for bird photography?
Do these Nikon Z8 and Z9 settings work on the Z50II?
What is the AF-handoff technique for birds in flight?
What shutter speed and ISO should I use for birds in flight?
Is subject detection always better than manual AF point selection for birds?
Keep this in your inbox
One email a week: what we actually watched, built and reviewed — the stuff worth a dad's time. No hype, no daily spam.
Dadnology Weekly
One email a week: the LEGO, gaming and movie news worth a dad's time — plus what we actually reviewed. No hype, no daily spam.
Disclaimer: This review and its visuals were created with the help of AI. Some links may be affiliate links – we may earn a commission if you make a purchase, at no extra cost to you.
Current deals in Cameras
Verified live discounts tracked on Amazon

Cameras · Tested by Dadnology
Nikon Z5 Body
5/5“The unbeatable on-ramp to full-frame mirrorless.”Read our reviewPrice as of Oct 17, 09:11 PM UTC


Cameras · Tested by Dadnology
Nikon Z50 Body
5/5“An honest look back at the DX body that started my Z journey.”Read our reviewPrice as of Oct 17, 09:11 PM UTC
You might also like

Nikon on sale: Buy the Z8, think twice about the Z6 II
The Z8, Z6II and Z5 all drop in price on sale days. Which one is worth it, from someone who owns a Z8 and shot a Z5 for years, plus the storage to go with it.
Nikon Z 70-200mm f/2.8 VR S vs VR S II: Which should you buy?
We've shot the original Nikon Z 70-200mm f/2.8 VR S for over five years and rate it a flat 5. Here's how it stacks up against the new VR S II - and which one you should actually buy.

Beach toy photography: How to shoot action figures and LEGO in the sand
The beach is the ultimate outdoor studio for toy photography if you respect the elements. Low ground-level angles turn sand ripples into mountain ranges, golden hour softens harsh plastic reflections, and a helping hand creates breathtaking in-camera dust storms.