
Spatial Computing at Home: The Dadnology Guide to Mac Virtual Display
Ditch the triple-monitor clutter. Learn how to turn your Mac Mini into a 100-inch virtual workstation using the Apple Vision Pro.
This post contains affiliate links. We may earn a commission if you make a purchase, at no extra cost to you. As an Amazon Associate, Dadnology earns from qualifying purchases.
1. Introduction: The Death of the Clunky Desk
🥽 This guide is part of our Apple Vision Pro Hub — Mac Virtual Display workflows and the accessories that actually help at work and home.
For years, the “ultimate” home office was defined by how much glass and metal you could cram onto a desk. We’ve all seen them — those sprawling triple-monitor setups that require a dedicated room just to justify the stands. The underlying logic was reasonable: more screen real estate equals more productivity. The problem was the physical reality: cable spaghetti, fixed positions, neck strain from off-center monitors, and setups that look incongruous in a family home where the desk also hosts homework, crafts, and the occasional LEGO rebuild.
The Mac mini M4 (here’s our full review) changed part of this equation by shrinking the computer itself to near-invisibility. The Apple Vision Pro changes a different part entirely: it makes the screen infinite and weightless. Through Mac Virtual Display (MVD), the Vision Pro acts as a high-resolution spatial bridge — “teleporting” your Mac’s entire desktop into a 3D environment that you can scale, position, and inhabit rather than stare at. Your monitors aren’t on your desk anymore. They’re everywhere you choose to put them.
At Dadnology, we don’t view this as a headset for games or a novelty device for demos. We see it as the most significant home office upgrade available today — one that happens to fit in a travel case.
AdApple Mac mini (2024, M4) (opens in a new tab)
The value king. 16GB RAM is now standard, making this $599 machine capable of handling real professional photo work.

2. Visual Horizons: The Three Display Modes
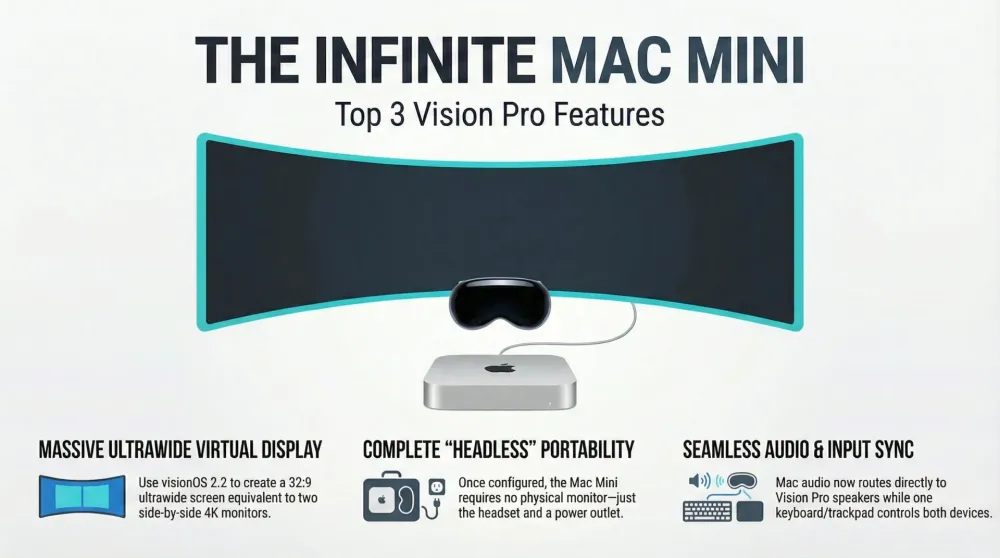
While the initial version of Mac Virtual Display was a neat trick, the visionOS 2.2 update transformed it into a legitimate “killer app.” The update moved beyond a simple mirror of your laptop screen to simulate massive ultrawide setups that would normally occupy half a room. Three distinct display modes cover the range from focused single-display work to expansive multi-window environments:
| Mode | Aspect Ratio | Equivalent Real-World Setup | Max Resolution |
|---|---|---|---|
| Standard | 16:9 | A high-end 5K Studio Display | Up to 5K (5120 x 2880) |
| Wide | 21:9 | A premium ultrawide productivity monitor | Up to 6720 x 2880 |
| Ultrawide | 32:9 | Two 4K monitors side-by-side | Up to 10240 x 2880 |
Standard Mode is the entry point: a single large display equivalent to the best monitor Apple sells. Clear, sharp, and appropriate for writing, browsing, and focused single-app work.
Wide Mode enters ultrawide territory — the format that creative professionals and developers have been buying dedicated monitors for. The extra horizontal space transforms Lightroom, Final Cut, and code editors: you can have your library and edit module open simultaneously without toggling panels.
Ultrawide Mode is the genuinely disorienting one. The first time you enable it, you’ll spend a few minutes just moving your head and watching the desktop extend further than any physical monitor setup you’ve worked with. For photographers, it means the culling grid on the far left, the editing module dominating the center, and Slack and Notes floating to the right — all at once, all in your field of view.
Beyond the display modes themselves, visionOS 2.2 added proper audio routing: Mac audio can now flow directly to the Vision Pro’s spatial speakers or to AirPods Pro, keeping you fully immersed in your work without the sound coming out of the Mac’s speakers to announce your activity to the rest of the household.
3. The Tactile Bridge: Real Input in a Virtual World
A common concern before first use is the “blind” feeling — the worry that you can’t see your physical keyboard or risk knocking over a coffee mug. Apple addressed this directly by designing the Vision Pro as a passthrough device first.
The Vision Pro’s cameras render your physical environment clearly enough to use your desk, keyboard, and peripherals naturally. You can see and interact with your Magic Keyboard and Magic Trackpad exactly as you always have — hands and hardware remain visible and crisp even when you’re fully inside an immersive Environment like Mount Hood or a neutral grey room. Physical keyboard shortcuts work. Touch ID on the Magic Keyboard unlocks your Mac and authorizes purchases without interrupting the spatial experience.
For visionOS-native interaction, the trackpad is the right tool. For traditional macOS work — keyboard shortcuts, Command-Tab, complex modifier key combinations — the Magic Keyboard is indispensable. Both devices pass through seamlessly. The transition between “using a spatial interface” and “using macOS with physical input” happens without modes or mode-switching — it’s just computing, expanded into a new dimension.
One practical note on cursor behavior: with Mac Virtual Display active, your Mac’s cursor moves naturally across the virtual screen and transitions smoothly into native visionOS windows. It takes approximately 20 minutes of use to stop noticing you’re working across a physical/virtual boundary.
3.5 The Practical Reality: First Week Learning Curve
No honest guide to Mac Virtual Display skips this part. The first five to seven days have a genuine shape to them, and knowing what to expect means you don’t mistake normal adaptation for a product problem.
Days 1–2: Slight disorientation, and that’s fine. The virtual screen floats in a position that feels unfamiliar — it isn’t anchored to a physical object, so your brain keeps checking its reference points. Cursor travel across a 100-inch virtual surface feels different than across a physical 27-inch monitor. You’ll reach for a keyboard shortcut and momentarily wonder if your hands are actually visible. They are — the passthrough cameras render them clearly and without meaningful lag — but your visual cortex needs a few sessions to stop running the sanity check. This is normal. It fades.
Days 3–4: Muscle memory arrives. You stop consciously noticing you’re looking at a virtual screen and start just using a screen. The three display modes shift from feeling like technical settings to feeling like deliberate choices you make for specific tasks. Wide for Lightroom, where the side panels stop fighting each other. Standard for focused writing, where a contained frame reduces distraction. Ultrawide for the mornings when the task list is long and you want to spread everything out and survey it before diving in. The choosing becomes intuitive rather than deliberate.
Days 5–7: The comparison to physical monitors stops being relevant. A real monitor can’t be repositioned to exact eye level in ten seconds. A real ultrawide can’t be packed into a shoulder bag. A real triple-monitor setup can’t be used in a hotel room or a train, or quietly in a bedroom while the rest of the house is asleep. The Vision Pro stops competing with physical monitors because it’s playing a different game entirely — it’s competing with not having monitors, and that’s a conversation physical hardware simply can’t enter.
One genuine first-week friction point to plan for: The HDMI dummy plug requirement for headless setups — described in detail in section 5 — catches almost everyone off-guard, usually on day one when they pack away the temporary monitor and find performance has quietly degraded. The symptoms are a sluggish cursor, reduced frame rate, and apps that feel subtly sticky. The cause is the GPU downclocking because macOS assumes no display is attached. The fix is a €5 dummy plug and about two minutes to plug it in. Finding the problem is the hard part; budget that 15 minutes on day one rather than troubleshooting it on a Wednesday afternoon when you have actual work to do.
4. The “So What?” Layer: Real Benefits for Real Home Offices
Strategic lifestyle benefits are often underemphasized in Vision Pro coverage, which tends to focus on technical specs. The actual reasons a parent or professional should make this shift are more prosaic and more persuasive:
The Triple-Monitor Killer: You can replace the footprint — and cost — of three physical monitors with a device that fits in a travel case. The displays are larger, infinitely scalable, and available in any room of the house. The desk gains back the space it previously sacrificed to monitor stands and cable management.
Ergonomics and Posture: Traditional monitor setups create “tech neck” — the forward head posture caused by looking slightly down and ahead at a fixed screen. With Mac Virtual Display, you can pinch and drag your display to exact eye level, encourage a neutral upright posture, and reposition everything whenever your neck or shoulders signal fatigue. The display follows you rather than forcing you to conform to it.
Privacy and Focus in a Family Home: When the house gets loud — kids home from school, dinner prep, homework chaos — use the AirPods Pro and the Vision Pro’s “Environment” immersion dial to gradually blend out the physical world. The Mac keeps running. Your work keeps loading. The noise becomes optional. This isn’t a gimmick: it’s a meaningful quality-of-life difference for anyone trying to sustain deep work in a shared family space.
Portability as a Core Feature: Your office is no longer a room; it’s a setup you carry. Hotel rooms, quiet corners of the house, visits to family — the full professional workspace travels with you in a bag that weighs a few kilograms. A photographer heading to a client location can bring the entire editing environment without a laptop stand, external monitor, or cable kit.
The Contractor and Freelancer Case: For anyone who works from a different physical location each day — client offices, cafés, co-working spaces, trains, the occasional airport departure lounge — MVD solves a specific and persistent problem that no laptop stand or portable monitor has ever cleanly solved. The “carry your entire office setup in a small bag” capability isn’t hyperbole; it means you arrive at a client site, put on the headset, and immediately have the same ultrawide workspace you use at home. No hunting for power outlets to hide cables behind. No apologizing for the portable monitor bracket that always attracts comments. No adapting to whatever mediocre external display the co-working space provides. The workspace is consistent, personal, and set up in under a minute. For contractors billing by the hour and freelancers whose output depends on their environment, that daily consistency compounds into something meaningful.
5. The “Headless” Powerhouse: Mac Mini + Vision Pro
The ultimate minimalist setup is a fully “Headless” Mac mini configuration. By pairing the M4 Pro Mac mini with the Vision Pro, the Mac acts as the brain and the headset acts as the sole display — eliminating physical monitors entirely. The desk holds only the Mac mini, a keyboard, a trackpad, and a power bank. The “screen” exists only when the Vision Pro is worn.
This setup requires a few one-time workarounds:
Initial Setup: You need a physical monitor once, just to configure your user account and enable Mac Virtual Display for the first time. After that, the monitor can be stored permanently.
The HDMI Dummy Plug: This is the critical pro tip that makes the setup work reliably. A small, cheap HDMI dummy plug tricks the Mac mini into believing a monitor is connected. Without it, the GPU downclocks because macOS assumes no display is attached, and performance degrades noticeably. With it, the Mac operates at full performance at all times.
Login Bypass: FileVault encryption prevents Mac Virtual Display from connecting before the Mac is logged in — because the disk isn’t decrypted yet. Two solutions: use an Apple Watch to auto-unlock on approach (the most elegant option), or type your password “blind” at the virtual login screen before MVD connects. Either becomes habit quickly.
Hardware Choice: M4 vs. M4 Pro
The M4 base model handles office work, light creative tasks, and casual photo editing well. In extended Lightroom testing, the M4 Pro cut 16-bit TIFF export times roughly in half — a material difference for photographers with large batch jobs. For pure office use and media consumption, M4 is sufficient. For photography, video, or development, M4 Pro is the correct choice.
To avoid Apple’s internal SSD pricing, use Thunderbolt ports and an external Samsung T7 Shield SSD. It matches internal SSD speeds for a fraction of the upgrade cost.
Video Calls in the Headless Setup: Zoom, Teams, and FaceTime all work from within Mac Virtual Display — you see the call window floating in your spatial workspace exactly like any other application. The one difference worth flagging: in a headless Mac mini setup, the camera feeding those calls is the Vision Pro’s forward-facing passthrough camera, not a traditional webcam. This means your on-camera framing depends on your head position rather than a fixed camera angle. For natural video call appearance, look slightly downward toward where your webcam would normally sit rather than at the virtual screen — callers see something much closer to a normal eye-level shot. It takes one test call to calibrate, and after that it’s unremarkable.
AdSamsung T7 Shield 2TB (opens in a new tab)
Fast, rugged USB-C storage. The essential companion to avoid Apple's overpriced internal SSD upgrades.
6. Expert Tweaks for a Stable, High-Quality Setup
A few refinements separate a “it mostly works” experience from a reliable daily driver:
Resolution Scaling: While MVD supports 5K output, setting your Mac to a scaled 1440p resolution often makes the UI feel more responsive if your connection shows any latency. The visual difference is minimal; the smoothness improvement is noticeable during fast interactions.
Wi-Fi Direct Range: Stay within 6–7 meters of the Mac. MVD uses Wi-Fi Direct — a device-to-device connection that bypasses your router — so home network speed is irrelevant, but physical distance matters more than most users expect. Walls attenuate the signal; line-of-sight range is reliable.
Color Accuracy: The Vision Pro covers approximately 92% DCI-P3 — excellent for most creative work. Note that True Tone and Night Shift are automatically disabled during MVD to maintain color consistency. For final print work or gallery-grade output where absolute color accuracy matters, complete the final color check on a calibrated Studio Display or color-managed monitor. MVD is accurate enough for 95% of creative work; the last 5% still benefits from a reference display.
Eye Comfort During Long Sessions: The Vision Pro was designed for extended wear, but display brightness during MVD can be higher than relaxed video watching. Use Night Shift or auto-brightness in macOS to reduce eye strain during evening sessions, and take brief breaks to let the eyes readjust to natural focus distances.
Pros
- Ultrawide mode replaces three physical monitors with a single headset
- Full passthrough means physical keyboard and mouse use is natural and uninterrupted
- Audio routing in visionOS 2.2 makes Mac sound fully immersive without disturbing others
- Headless Mac mini setup creates the cleanest possible desk — no monitors at all
- Environment immersion dial delivers genuine focus isolation in noisy family homes
- M4 Pro performance makes the setup viable for demanding professional workflows
Cons
- HDMI dummy plug is a workaround — not a polished Apple-designed experience
- FileVault login sequence before MVD connects is a minor but persistent friction point
- Color-critical work still benefits from a calibrated physical reference monitor
- Wi-Fi Direct range limitation means you can't wander freely with the headset
- Full setup cost (Vision Pro plus capable Mac) is significant
When Mac Virtual Display Isn’t the Right Tool
Honesty is the point of this guide, so: there are workflows and situations where MVD is not the right answer, and knowing them in advance saves frustration.
Color-critical final output. MVD covers approximately 92% DCI-P3 — that’s excellent for the majority of creative work, and for most photographers it’s entirely sufficient through the editing and retouching stages. But professionals whose final deliverable requires absolute color accuracy — print proofing for press, gallery output for archival display, broadcast master delivery — still need the final check on a calibrated physical reference display. The Studio Display or a dedicated color-managed monitor is the right endpoint for that last 5%. MVD gets you most of the way there; the final check has a different tool.
Low-latency gaming. Mac Virtual Display uses Wi-Fi Direct, and Wi-Fi Direct has inherent round-trip latency that casual use never surfaces but competitive gaming absolutely does. Fast-paced shooters, anything requiring sub-10ms response times, or competitive titles where milliseconds carry real consequences — these belong on a direct-connected physical display. Casual gaming and cloud-based titles like GeForce Now are fine through MVD; competitive gaming is not, and trying to make it work is an exercise in frustration rather than a settings problem.
Collaborative physical work. When you need someone else in the room to see your screen — design feedback sessions, code review with a colleague, pair programming, showing a client a draft — the Vision Pro is private by design. The display exists only inside the headset. A physical monitor is the right tool for any scenario where the display is meant to be shared rather than personal. No workaround exists here; it’s an architectural characteristic of the technology, not a missing feature.
When you’re tired or have a headache. Extended near-eye display use is comfortable for healthy eyes under normal conditions; it is noticeably less comfortable when you’re already fatigued. The Vision Pro is not a twelve-hour straight-session device regardless of workflow. If your eyes are already strained, your head hurts, or it’s past 11 PM and you’re pushing through a deadline — take it off. The Mac keeps running, the display comes back instantly when you put it on again, and your eyes will thank you the next morning.
7. Conclusion: Your New Command Center
Spatial computing isn’t just a new way to look at your computer — it’s a different relationship with the concept of a workspace. By adopting Mac Virtual Display, you’re trading a static, cluttered desk for a focused, ergonomic, and infinitely expandable command center. The technology is sophisticated; the Dadnology goal is simple: making your work life more comfortable and your creative time more productive.
The setup has real friction in the first week. By the second week, it’s routine. By the second month, going back to a physical monitor feels claustrophobic.
Mac Virtual Display is the feature that transforms Vision Pro from an interesting device into a daily driver for professionals. Pair it with an M4 Pro Mac mini and you have the most capable home office setup available — one that fits in a bag.
Related Dadnology guides: YouTube is Finally Native on Apple Vision Pro · Essential Accessories for Apple Vision Pro · Beyond the Hype
📌 FAQ – Mac Virtual Display
Does Mac Virtual Display support multiple virtual monitors?
Can I use a non-Apple keyboard and mouse?
What happens to the Mac's audio?
Is the 16GB RAM model enough for Mac Virtual Display workflows?
Do I need Wi-Fi for Mac Virtual Display, or can I use a cable?
Keep this in your inbox
One email a week: what we actually watched, built and reviewed — the stuff worth a dad's time. No hype, no daily spam.
Dadnology Weekly
One email a week: the LEGO, gaming and movie news worth a dad's time — plus what we actually reviewed. No hype, no daily spam.
Disclaimer: This review and its visuals were created with the help of AI. Some links may be affiliate links – we may earn a commission if you make a purchase, at no extra cost to you.
You might also like
Is a Mac Mini Good for Small Business Local AI?
If the reason you have not adopted AI is that client data cannot leave the building, this is the cheapest honest answer — with four real caveats.
Is a Mac Mini a Good First Computer for Kids? A Dad's Take
Its best feature for a child is the one nobody markets: it cannot be taken to a bedroom. Here is the honest case, and when a tablet wins instead.
The Mac Mini Is an AI Machine Now, and That's Why It's Sold Out
The Mac mini quietly became AI infrastructure, and the queue you are standing in now includes companies buying them by the rack. That does not change what a family needs, but it does change when you should buy and which upgrades are worth paying Apple for.