Build a Home Assistant Dashboard With AI: A Step-by-Step Guide
A step-by-step method for building a clean, Apple-inspired Home Assistant dashboard with an AI co-pilot — entity list, clear concept, the right cards, and iterative YAML.
This post contains affiliate links. We may earn a commission if you make a purchase, at no extra cost to you. As an Amazon Associate, Dadnology earns from qualifying purchases.
1. Introduction: The Dashboard Is the Face of Your Smart Home
🏠 This guide is part of our Home Assistant Brand DNA – the local-first smart home we actually trust, and the platform this whole dashboard runs on.
The dashboard is the face of your smart home — and the part where a lot of people quietly give up. It’s either overloaded with a hundred tiles nobody can parse, or so minimal you can never find the thing you actually need. Getting it right by hand means learning the quirks of half a dozen card types, and that’s exactly the kind of fiddly, syntax-heavy work where an AI co-pilot shines.
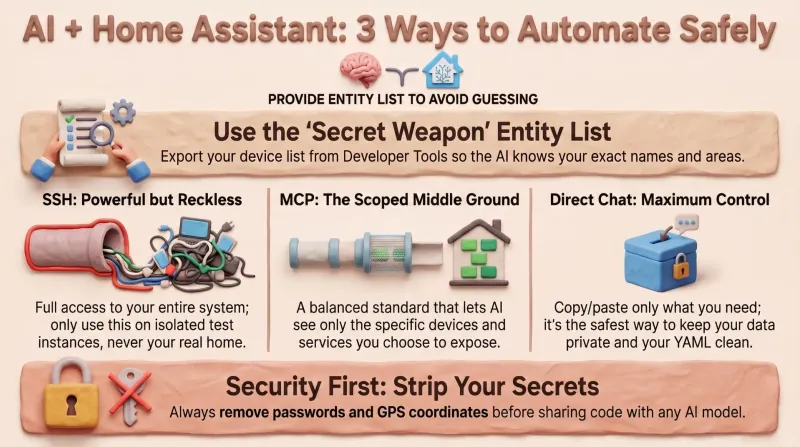
With an AI doing the YAML, you can build a tidy, genuinely good-looking dashboard surprisingly fast. This is the complete path — from preparation to a finished, cross-device layout that looks right on a hallway tablet and a phone alike. It’s the second part of a series: if you haven’t yet seen how to connect an AI to Home Assistant sensibly in the first place, start with part one, because the entity-list trick it introduces is the foundation everything below stands on.
AdThe Engine Behind the Tablet (opens in a new tab)
Home Assistant Green is the ready-to-run hub that powers a wall-tablet dashboard — local, fast, no subscription.

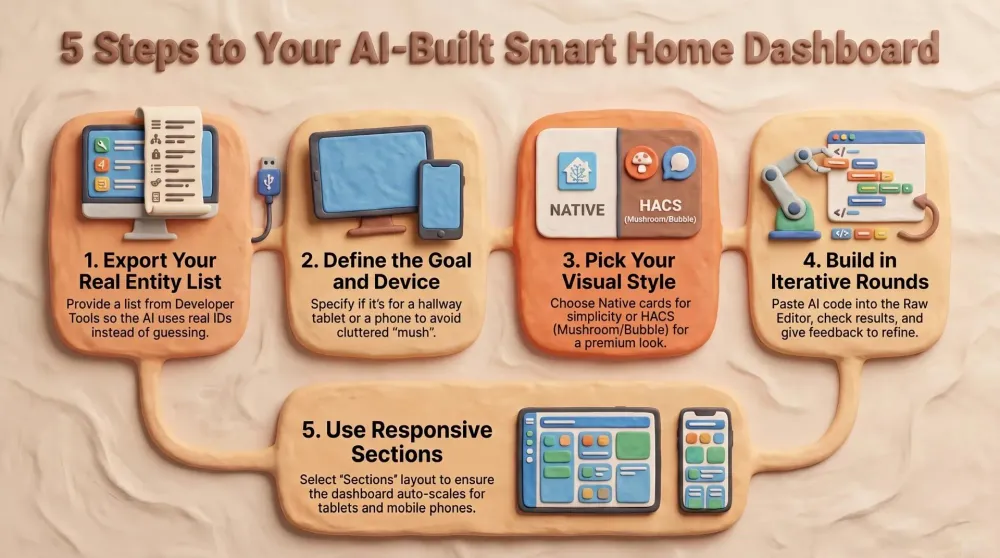
2. Step 1: The Foundation — Your Entity List
Before a single card exists, the AI needs your inventory. Generate the complete list of every device and entity once, via Developer Tools → Template, with this template:
{% for s in states -%}
{%- set did = device_id(s.entity_id) -%}
{{ (device_attr(did,'name_by_user') or device_attr(did,'name')) if did else '(no device)' }};{{ area_name(s.entity_id) or '—' }};{{ s.entity_id }};{{ s.name | replace('\n',' ') | replace(';',',') }};{{ s.state }}
{% endfor %}
Out comes a list in the format Device ; Area ; entity_id ; Name ; State. Hand that list to the AI and it knows every ID, every room and every current value. That single step saves you most of the debugging later, because nothing gets guessed. A tile that points at a real, correctly-named entity works the first time; a tile built on a hopeful light.living_room that doesn’t exist just sits there blank, and you waste twenty minutes finding out why.
3. Step 2: Define the Goal Before You Start
A good dashboard doesn’t begin with cards — it begins with questions. Get clear, for yourself and for the AI:
- Who uses it? Just you, or the whole family?
- On which device? A wall tablet in the hallway (kiosk mode), the phone, the browser — or all of them?
- What must be visible at a glance? And what’s allowed to disappear behind a single tap?
In our own project the brief was clear: a lean, Apple-inspired dashboard for a hallway tablet that also looks good on a phone. The guiding idea — the home screen shows only what matters, everything else is exactly one tap away. Warnings (a window left open, a low battery, high humidity) only appear when they’re relevant; the rest of the time the screen stays calm and quiet.
The more precisely you can state that concept, the better the AI’s first draft will be. “Make me a dashboard” gets you mush. “A calm hallway-tablet home screen with status chips on top, three big tiles for battery, energy price and hot water, and warnings that only show when triggered” gets you something you can actually refine.
AdA Host That Renders Anything (opens in a new tab)
A Raspberry Pi 5 with an SSD runs HACS and custom cards smoothly — the flexible base for an ambitious dashboard.
4. Step 3: Choose the Right Cards
Home Assistant ships good cards out of the box — Tile and Sections — that already look tidy. If you want more character, you reach into HACS (the Home Assistant Community Store). Three custom cards have earned their place in our setup, each for one strength:
- Mushroom — sleek, rounded tiles. The workhorse for the look.
- Bubble Card — expandable pop-ups. Perfect for the “home screen stays empty, details open in a sheet” principle.
- card-mod — CSS polish. Round corners, tweak colours and — especially handy — show or hide cards depending on state (this is how the self-hiding warning banners work).
You don’t need all three. Native cards are enough for a clean result; the HACS cards lift it to the next level. The key move: tell the AI exactly what you have installed. A model that knows you’re running Mushroom and Bubble Card writes to those cards; one that’s left guessing reaches for a card you don’t have, and the tile renders blank.
5. Step 4: Work Iteratively — The Actual Build
Now the pleasant part. Instead of demanding everything at once, you work in rounds:
- Describe one area. For example: “Build me a home screen with status chips on top (weather, alarm, open windows), then house battery, energy price and hot water as big tiles, and quick-action buttons for ‘All lights off’ and ‘Hot-water boost’.”
- Let the AI generate the YAML — and explicitly ask it to validate every entity against your list.
- Paste it in via the Raw editor: open the dashboard → Edit (pencil) → three-dot menu → Raw configuration editor → drop the content in → save.
- Look, give feedback, refine. “The battery shows up twice”, “make the room tiles fully clickable”, “optimise the arrangement for the tablet” — that’s exactly how the dashboard grows.
This back-and-forth is the AI’s real strength. You don’t need to know how a mushroom-template-card is structured — you describe the result, and the AI handles the syntax. Each round is cheap, so you experiment freely: try a layout, dislike it, ask for a different one, and you’ve lost two minutes instead of an evening.
A concrete example of where this pays off: the self-hiding warning banner. The brief is simple in plain English — “show a red banner only when a window is open, and make it vanish completely when everything’s shut.” Writing that by hand means wiring a card-mod template that reads the state of a group and toggles display: none, which is exactly the kind of finicky syntax most people never learn. With the AI you just describe the behaviour, hand it the entity for your window group from the list, and ask it to hide the card when the state is off. Two rounds later the hallway tablet sits quiet all day and only lights up red when it actually matters — and you never touched a line of CSS yourself. That single pattern, repeated for low batteries and high humidity, is what makes a dashboard feel calm instead of cluttered.
6. Step 5: One Layout for Every Device
A dashboard has to work on the tablet and the phone. The trick is Home Assistant’s Sections view: it arranges cards responsively on its own — multiple columns on a wide tablet, stacked into one column on a narrow phone. So on a hallway tablet in landscape you use the space optimally (ideally with no scrolling at all), while on the phone everything stacks neatly underneath itself.
For a kiosk tablet, it’s worth telling the AI to increase the column count so the home screen fits the available height and never needs scrolling. These are the kinds of details you test on the actual device and nudge over a round or two — the AI gets you 90% there, and the last 10% is you standing in the hallway saying “a touch bigger, and move the alarm chip left.”
AdReal Entities to Fill It (opens in a new tab)
A Zigbee coordinator gives your dashboard live, local tiles — sensors and buttons that respond instantly, internet or not.
7. The Most Common Traps (and How to Dodge Them)
- Guessed entities. Without the entity list, the AI invents IDs. Always supply the list and have it cross-check.
- Misleading IDs. An entity called
light.wohnzimmerlampe_2might physically hang in the dining room. Trust the area from the export, not the name of the ID. - Missing HACS cards. If the YAML uses a custom card you haven’t installed, the tile stays blank. Tell the AI what you’ve got.
- Version-dependent syntax. Some extensions (Bubble Card, for instance) change their format across major versions. Tell the AI the version and the code fits.
- Group IDs with a suffix. Create a light group called “Floor lamp” when the name’s already taken and Home Assistant assigns
light.stehlampe_2. Rename such IDs cleanly in the entity settings — otherwise the tile points at nothing.
8. Bonus: Write Your Conventions Down
As the dashboard grows, a few fixed rules keep it consistent. Two examples from our own project:
- Lamps: several smart bulbs in one fixture get merged into a single light group; the dashboard always controls the group, never the individual bulbs.
- Function rooms vs. living rooms: motion light in the cellar always switches on; outside it only switches on after dark.
You can keep conventions like these in a small notes file — we use a CLAUDE.md in the project — and hand it to the AI, so the style stays uniform across many sessions. It’s the same instinct as a house style guide: write the rule once, and every future round inherits it instead of relitigating it.
Pros
- You describe the result; the AI writes the card YAML
- An entity list keeps every tile pointed at a real device
- Sections view gives one layout that fits tablet and phone
- Iterating in rounds is cheap — experiment without fear
Cons
- HACS cards add power but also versioning quirks to track
- The AI needs to be told exactly what you have installed
- Kiosk fine-tuning still happens on the real device, by hand
Conclusion: A Dashboard That Fits Your Life
A good dashboard is no dark art if you go about it methodically: the entity list first, then a clear concept, the right cards, and finally the iterative build with the AI as co-pilot. You supply the knowledge about your home and the result you want; the AI translates it into clean YAML.
The Final Word: the payoff isn’t just a dashboard that works — it’s one that fits your actual daily life, the warnings staying quiet until they matter and the important stuff one tap away. Pair this with the connection methods from part one and you’ve got a repeatable way to shape your smart home, screen by screen, without ever learning a card’s syntax by heart.
📌 FAQ – Frequently Asked Questions
Do I need HACS cards to build a good Home Assistant dashboard?
How do I stop the AI from inventing entities on my dashboard?
How do I make a Home Assistant dashboard work on both tablet and phone?
What are Mushroom, Bubble Card and card-mod?
How do I paste AI-generated YAML into my dashboard?
Dadnology Weekly
One email a week: the LEGO, gaming and movie news worth a dad's time — plus what we actually reviewed. No hype, no daily spam.
Disclaimer: This review and its visuals were created with the help of AI. Some links may be affiliate links – we may earn a commission if you make a purchase, at no extra cost to you.
You might also like
Editing Home Assistant With AI: 3 Ways to Manage Your Smart Home
After reading this you'll know exactly how to let an AI help with your Home Assistant config without handing over the keys to your house — and how to generate the entity list that stops it from ever guessing an ID.
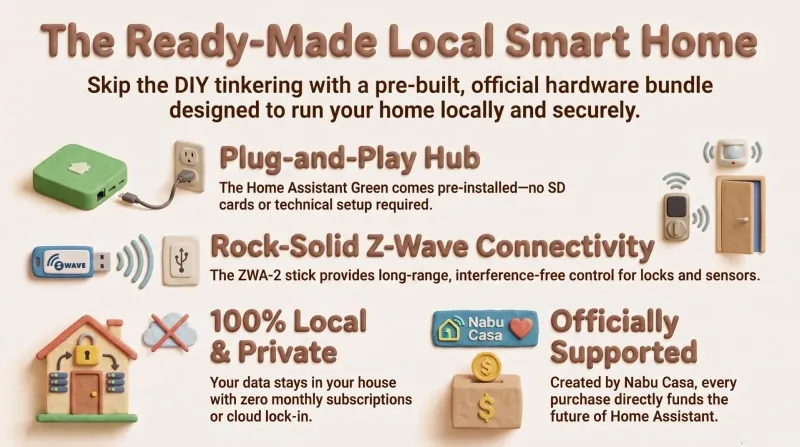
Home Assistant Green + Connect ZWA-2: The Ready-Made Local Smart Home
Home Assistant Green plus the Connect ZWA-2 is the closest thing to a 'just works' local smart home: official hardware, no SD-card flashing, no subscription, and Z-Wave that reaches the whole house. The ready-made bundle we'd hand to any dad who wants the result without the tinkering.

Raspberry Pi + Home Assistant – The Local-First Smart Home That Actually Belongs to You
This Raspberry Pi + Home Assistant setup is the moment the smart home finally feels yours. Local control is instant and private; nothing breaks when a vendor’s cloud stumbles. Philips Hue, Ring, Zigbee, Z-Wave, Matter, Wi-Fi gadgets—all coordinate in one gorgeous dashboard. Automations are addictive, presence works, and backups keep everything safe. Even the family notices: lights behave, doorbells pause TV, bedtime scenes just happen. It’s flexible, fast, reliable, and fun. Ten out of ten, no contest, every single day.