Editing Home Assistant With AI: 3 Ways to Manage Your Smart Home
Three honest ways to let an AI help with your Home Assistant YAML — SSH, MCP, and plain chat — plus the entity list that stops the model from guessing IDs.
This post contains affiliate links. We may earn a commission if you make a purchase, at no extra cost to you. As an Amazon Associate, Dadnology earns from qualifying purchases.
1. Introduction: The End of Hand-Typing YAML
🏠 This guide is part of our Home Assistant Brand DNA – the local-first smart home we actually trust, and the platform every automation here runs on.
If you use Home Assistant seriously, you eventually live in YAML files: automations.yaml, configuration.yaml, the dashboard. It’s powerful, it’s local, and it’s also fiddly enough that a single missing indent can take down your whole morning routine. This is exactly the work modern AI models are good at — they write, fix and explain configurations faster than you can type them, and they don’t sulk when you ask for the fifth revision at 11pm.
So the interesting question was never whether to let an AI help. It’s how you let it near your smart home. Because your house is not a sandbox: it’s cameras, door sensors, the alarm, presence detection, the front-door lock. Hand the wrong level of access to the wrong tool and you’ve turned a convenience into an attack surface. This guide walks through three ways to connect an AI to Home Assistant — SSH, MCP, and plain chat — with an honest verdict on which one actually earns its place in everyday family life.
AdThe Easiest Place to Run It (opens in a new tab)
Home Assistant Green gives you a ready-to-go, local-first hub — the simplest box to host everything in this guide.

2. First Principle: The AI Doesn’t Know Your House
Before any of the three methods, internalise the one rule that decides whether this goes well: the AI is a brilliant co-pilot, but it has never been to your house.
It doesn’t know that light.wohnzimmerlampe_2 is actually the lamp hanging in the dining room because you moved it and never renamed the entity. It doesn’t know that a particular sensor has been flashing a dead battery for three weeks. It can’t tell that the “garage” automation really controls the carport. That knowledge lives with you. The AI’s job is to turn your knowledge into clean, working code — not to invent the missing pieces.
Keep that division of labour in your head and everything downstream gets easier. You supply the facts about your home; the AI supplies the syntax. The moment you expect the model to know your setup instead of being told it, you get plausible-looking YAML that points at entities which don’t exist. Which, conveniently, is the exact problem the entity list in Section 5 solves.
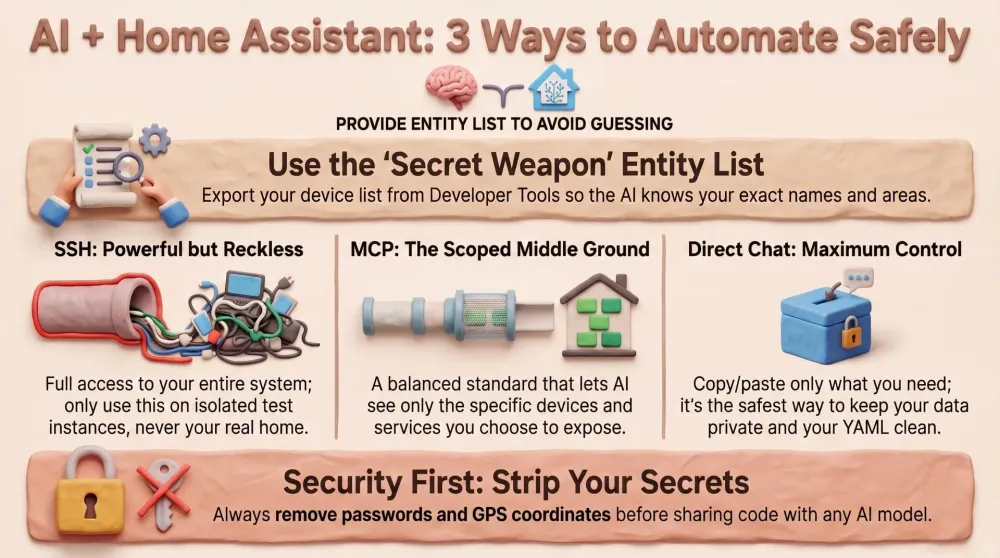
3. Way 1: SSH Access — Powerful, But Reckless
The most obvious idea: give an AI agent direct SSH access to the Home Assistant box and let it do everything itself — read files, change them, restart services, the lot. Technically it works, and it’s genuinely convenient. You ask, it acts.
I don’t recommend it on a production system, and I want to be blunt about why. SSH is full access to the entire machine. The AI — or rather the agent driving it — can run any command and read any file: tokens, passwords, location data, the contents of secrets.yaml, all of it. Even if you trust the model completely, you’ve handed over an enormous attack surface and given up visibility into what’s actually happening step by step. For the literal nervous system of your home — the thing wired to your locks and alarm — that trade is not worth it.
If you ever do this, do it in an isolated test instance only: a throwaway Home Assistant on a spare Raspberry Pi with no real devices attached, where a mistake costs you a re-flash and nothing else. Never on the system the family relies on at 6am.
AdBuild a Safe Test Instance (opens in a new tab)
A spare Raspberry Pi 5 is the perfect throwaway box for experimenting with agent access before it ever touches production.
4. Way 2: MCP — The Clean Middle Ground
The Model Context Protocol (MCP) is an open standard that lets AI models talk to external tools in a defined, structured way. Home Assistant ships its own MCP server, and there are additional community implementations on top.
The decisive advantage over SSH is that MCP is scoped. The AI doesn’t get the whole operating system — it gets only the interfaces and entities you explicitly expose. It can query and switch the devices you’ve allowed, but it can’t go rummaging through arbitrary system files. That’s dramatically safer than an open shell, while still being comfortable, because the model can read the live state of your smart home and act on it.
For a lot of people that makes MCP the right call: you want automation and convenience, you want the AI to see real-time state, but you’re not about to throw the front door wide open. The caveat that remains: you are still granting access to real devices. Think carefully about what you expose — switching a lamp is one thing, exposing a lock or an alarm panel is another. Scope it down to what you actually need the model to touch, and review that list the same way you’d review app permissions on a new phone.
5. Way 3: Direct Chat With Targeted File Input — My Favourite
My preferred method is the least dramatic of the three: I work directly in the chat window and give the AI only exactly what’s being edited right now. No standing access, no open connection into the house — I decide, at every single step, what the model gets to see.
In practice that means I copy the file I’m working on into the chat — the automations.yaml, or the dashboard.yaml — and describe what I want changed. The AI hands back the adjusted version, I read it, and I paste it back. Full control, minimal data leaving the house, and it works with any model — Claude, ChatGPT, Gemini — with zero extra setup. No server to install, no permissions to wire up, nothing running in the background.
The thing that turns this from “fine” into genuinely powerful is one extra input: a complete device-and-entity list.
The Secret Ingredient: A Complete Entity List
An AI can write flawless YAML and still produce broken automations — because if it doesn’t know your exact entity IDs, it guesses. And a guessed ID like light.wohnzimmer (which may not exist, because your lamp is actually light.stehlampe_3) gives you cards and automations that simply don’t fire.
The fix: hand the AI a full list of every device and entity, once. Home Assistant can generate this itself — no add-on, no extra software — straight from the Developer Tools.
Here’s how:
- In Home Assistant, open Developer Tools → Template tab.
- Paste this template into the left-hand field:
{% for s in states -%}
{%- set did = device_id(s.entity_id) -%}
{{ (device_attr(did,'name_by_user') or device_attr(did,'name')) if did else '(no device)' }};{{ area_name(s.entity_id) or '—' }};{{ s.entity_id }};{{ s.name | replace('\n',' ') | replace(';',',') }};{{ s.state }}
{% endfor %}- On the right, a list appears instantly in the format:
Device ; Area ; entity_id ; Name ; State. - Copy that output and save it as a text file (e.g.
devices_and_entities.txt).
This list is gold. It contains every entity with its friendly name, assigned room and current state — even helpers, automations and weather that aren’t tied to any physical device. With it, the AI can cross-check every ID before it writes a line, and it correctly maps even cryptic devices (Homematic, Zigbee) to the right room. A binary_sensor with a hex-string name suddenly becomes “the patio door, in the Living Room” — and the model writes against reality instead of a hopeful guess.
💡 Tip: regenerate the list whenever devices are added, removed or renamed. If you work in a project workspace (Claude Projects, a custom GPT, a Gemini Gem), drop the file in there once and it’s available in every new chat automatically.
The Typical Workflow
- Generate the entity list — once, and again whenever things change.
- Paste the file to be edited into the chat (
automations.yaml,dashboard.yaml, …). - Describe what you want — the more specific, the better.
- Ask the AI to validate every entity it used against the list.
- Paste the result back, run Check Configuration in Developer Tools, then reload or restart.
- Test it — and go another round if needed.
That loop is the whole game. You stay the editor-in-chief; the AI is the fast, tireless intern who never mistypes an indent.
AdMake It Truly Local (opens in a new tab)
A Zigbee coordinator means the automations your AI writes run inside your house — instant, private, and alive even when the internet isn't.
6. The Three Ways, Side by Side
| What matters | SSH access | MCP server | Direct chat + file |
|---|---|---|---|
| Control over each step | Low — agent acts on its own | Medium — scoped to exposed entities | Total — you paste every change |
| Data leaving the house | Potentially everything | Only exposed entities/state | Only the file you choose |
| Setup effort | Low, but risky | Medium (install + scope) | None — works with any model |
| Live device access | Full system | Real-time, scoped | None — you are the bridge |
| Safe for production? | No | Yes, if tightly scoped | Yes |
If you want a one-line takeaway: MCP for live convenience with guardrails, direct chat for maximum control, SSH only on a throwaway box.
7. The Safety Rules That Always Apply
Whichever route you pick, these four rules are non-negotiable.
- Share no secrets. Before you copy a
configuration.yamlinto a cloud chat, strip API tokens, passwords, precise GPS coordinates and keys. If you’re already using!secretandsecrets.yaml— and you should be — the sensitive values aren’t in the shared file at all. - Back up before every bigger change. A Home Assistant snapshot takes 30 seconds and saves your evening. Make it a reflex, not an afterthought.
- Check the config before restarting. Developer Tools → YAML → Check Configuration catches most mistakes before they take the system down.
- Understand what you paste. If something in the AI’s output is unclear, ask it to explain — don’t blindly commit code you don’t follow. The model is a co-pilot, not an autopilot.
8. Hardware: What You Actually Run This On
None of these methods need exotic gear — they need a stable Home Assistant box. There are two sensible routes for a dad starting out.
The plug-and-play route: the official Home Assistant Green. You unbox it, plug in Ethernet and power, open the browser, and you have a local-first hub with no subscription and no cloud lock-in. It’s the lowest-friction way to get a real system that the AI workflows above can run against.
The tinkerer’s route: a Raspberry Pi 5 with an SSD. Slightly more setup, far more flexibility — and crucially, the perfect platform for spinning up that isolated test instance before you ever experiment with agent access on the real thing. Add a Zigbee coordinator and your automations run locally, instantly, and keep working when the internet drops.
Either way, the principle holds: get the foundation solid and local first, then let the AI help you shape what runs on top of it.
Pros
- Direct chat works with any model and needs zero setup
- An exported entity list stops the AI from ever guessing IDs
- MCP gives live, scoped access without opening the whole system
- Everything stays local-first — your home, your rules
Cons
- SSH access to production is a genuine security risk — avoid it
- You still have to supply the knowledge; the AI won't learn your house on its own
- Pasting files by hand is the safest route but the least automated
Conclusion: Pick the Method, Not Just the Model
SSH is powerful but, for the production system that runs your locks and alarm, simply too risky. MCP is the clean, scoped middle ground when you want live access and convenience with guardrails. And direct chat with targeted file input is, for me, the calmest route of all: maximum control, minimal data leaving the house — and with a good entity list at its side, the AI writes configurations that work on the first try.
The Final Word: the model you use matters less than the method you choose. Export your entity list, keep secrets out of the chat, and let the AI do the typing while you stay in charge of the house. Next up in this series: how to use exactly this setup to build a complete, beautifully tidy Home Assistant dashboard.
📌 FAQ – Frequently Asked Questions
Which AI model is best for editing Home Assistant?
Should I give an AI agent SSH access to Home Assistant?
What is the Home Assistant MCP server?
How do I export a list of all my Home Assistant entities?
Is it safe to paste my configuration.yaml into an AI chat?
Dadnology Weekly
One email a week: the LEGO, gaming and movie news worth a dad's time — plus what we actually reviewed. No hype, no daily spam.
Disclaimer: This review and its visuals were created with the help of AI. Some links may be affiliate links – we may earn a commission if you make a purchase, at no extra cost to you.
You might also like
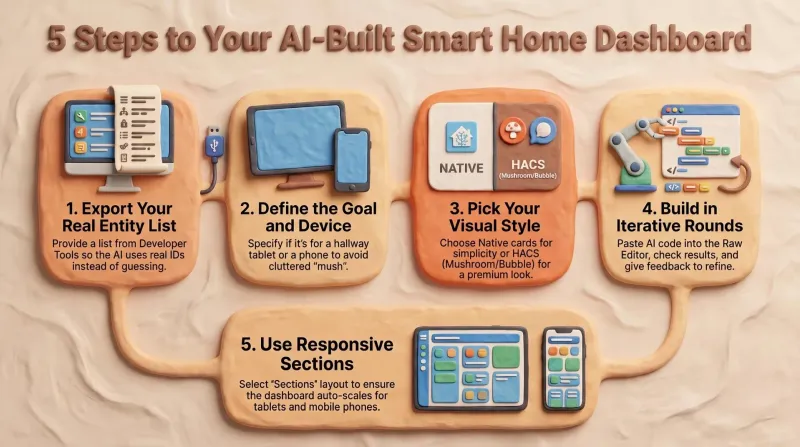
Build a Home Assistant Dashboard With AI: A Step-by-Step Guide
After reading this you'll have a repeatable method for building a calm, responsive Home Assistant dashboard with an AI doing the YAML — driven by your entity list and a clear concept rather than guesswork.
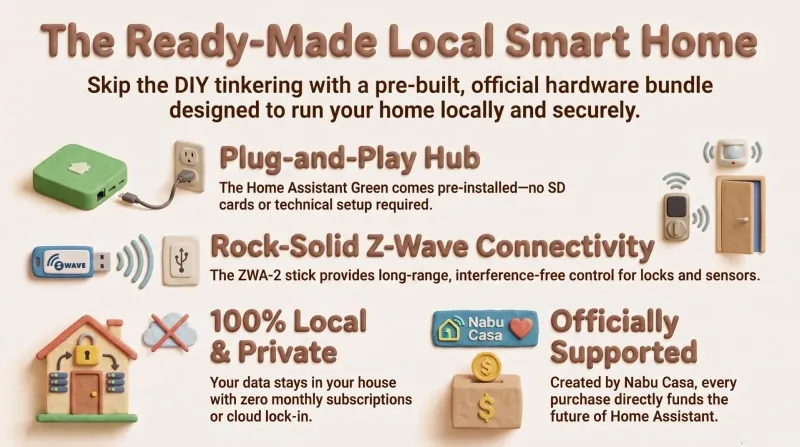
Home Assistant Green + Connect ZWA-2: The Ready-Made Local Smart Home
Home Assistant Green plus the Connect ZWA-2 is the closest thing to a 'just works' local smart home: official hardware, no SD-card flashing, no subscription, and Z-Wave that reaches the whole house. The ready-made bundle we'd hand to any dad who wants the result without the tinkering.
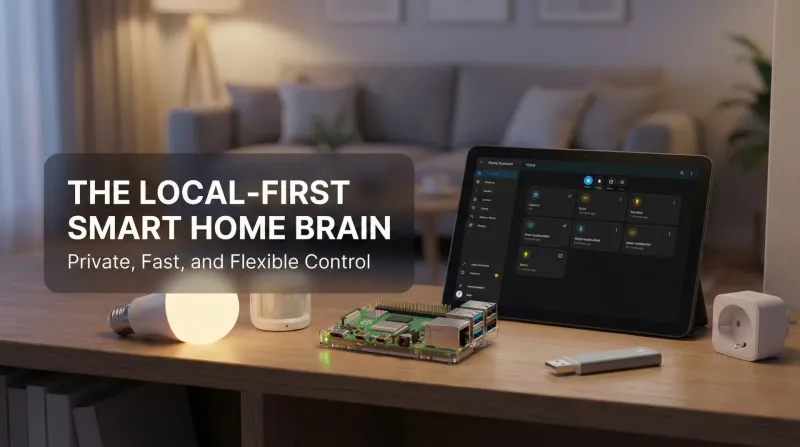
Raspberry Pi + Home Assistant – The Local-First Smart Home That Actually Belongs to You
This Raspberry Pi + Home Assistant setup is the moment the smart home finally feels yours. Local control is instant and private; nothing breaks when a vendor’s cloud stumbles. Philips Hue, Ring, Zigbee, Z-Wave, Matter, Wi-Fi gadgets—all coordinate in one gorgeous dashboard. Automations are addictive, presence works, and backups keep everything safe. Even the family notices: lights behave, doorbells pause TV, bedtime scenes just happen. It’s flexible, fast, reliable, and fun. Ten out of ten, no contest, every single day.