
SmallRig RM01 Mini LED Light Kit Review: The Toy Photography Game-Changer
Our hands-on review of the SmallRig RM01 Mini LED 3-Pack: how three pocket cubes with snoots, diffusers, and honeycombs turned our LEGO dioramas cinematic.
This post contains affiliate links. We may earn a commission if you make a purchase, at no extra cost to you. As an Amazon Associate, Dadnology earns from qualifying purchases.
If you shoot LEGO sets or miniature tabletop dioramas, you quickly discover an inescapable law of optics: light sources built for human-sized studios are far too big for 4cm minifigures.
On our studio stage, we use big Bowens-mount continuous LEDs and softboxes for baseline illumination. But whenever you want to create drama — carving a hero out of the darkness, throwing a razor-sharp rim light along a helmet, or illuminating a tree trunk without blinding the background — full-size studio panels spill light everywhere.
Enter the SmallRig RM01 Mini LED Video Light Kit (3-Pack).
I bought this kit as an expansion for our toy photography rig, and within thirty minutes of unboxing, it proved to be an absolute game-changer. In this review, I break down why three palm-sized cubes and a box of magnetic modifiers gave us more creative lighting control than thousands of dollars in full-size studio gear.
AdSmallRig RM01 Mini LED Video Light Kit (3-Pack) (opens in a new tab)
Three waterproof cube LED lights with magnetic modifiers (silicone diffusers, honeycombs, barndoors, snoots and gels) — our portable 3-point lighting secret weapon for tabletop LEGO and toy photography.
The Role in the Studio: Precision Accents Alongside Big Softboxes
To be clear: the SmallRig RM01s do not completely replace our main studio lighting. On our stage setup, our two large continuous LED lights (the Godox SL60IID and NEEWER CB60B) fitted with gridded strip softboxes still do the heavy lifting from the left and right, creating the foundational cross-lighting that defines the environment.
The problem is that even with grids, a 60x90cm softbox throws a beam measured in feet. When you want to highlight a single 4cm minifigure, light up an internal chamber, or carve a sharp edge on a tiny weapon, large studio panels inevitably spill light where you don’t want it.
The SmallRig RM01 cubes are the surgical additions:
- The emitter is smaller than a 2x4 LEGO brick. You can position it inches away from a minifigure without blocking your camera lens.
- The magnetic modifiers actually sculpt the beam. The honeycomb grids cut side-spill entirely, while the rubber snoots turn the beam into a laser-focused spotlight.
- They hide inside the set. At 63 grams, you can tuck an RM01 behind a miniature boulder, under a LEGO archway, or perch it in the upper canopy.
Hands-On: Staging the LEGO Zelda Great Deku Tree
The real test came when shooting our flagship review of the LEGO The Legend of Zelda: Great Deku Tree (77092). The Deku Tree is a sprawling, sculptural 2,500-piece build with dark bark, pink foliage, and a tiny Link minifigure holding the Master Sword in front of the base.
Here is how we progressively layered the lighting to build the final shot:
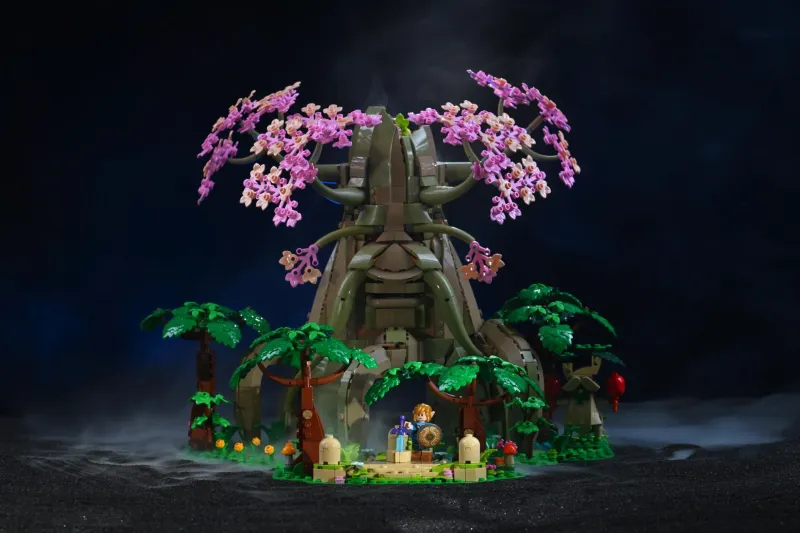
Phase 1: The Isolated Key Spotlight (1 SmallRig)
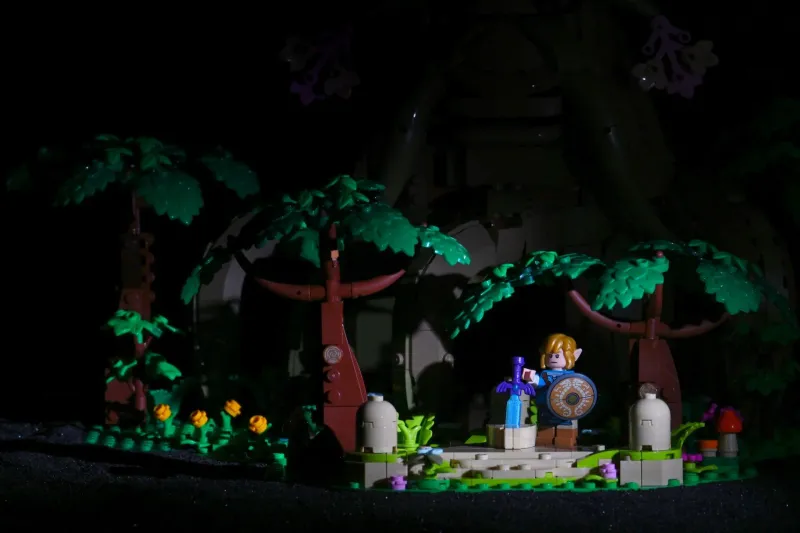
In our first test composition, we wanted Link completely isolated in the dark, mysterious woods. We kept the ambient stage light minimal and aimed just one single SmallRig RM01 with a snoot directly at Link and the Master Sword pedestal:
Phase 2: Revealing the Ancient Tree (2 SmallRigs)
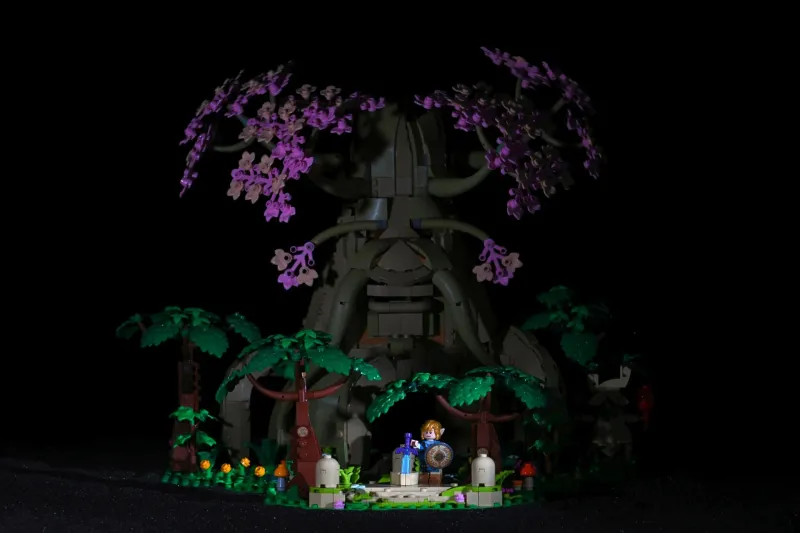
An isolated hero is dramatic, but we wanted the presence of the Great Deku Tree felt in the background. For the second shot, we brought in a second SmallRig RM01 fitted with the silicone dome diffuser, positioned to the left. The diffuser softened the beam into a gentle fill that gently lifted the tree trunk and pink canopy out of the gloom without overpowering Link:
Phase 3: The Full Trio + Softboxes + Smoke (3 SmallRigs)
For the final hero frame, all elements came together. Our main gridded softboxes from the left and right filled the overall diorama with balanced cross-light, while all three SmallRig lights worked in concert:
- Light 1: The focused snoot spot on Link and the Master Sword.
- Light 2: The silicone-diffused fill light accenting the Great Deku Tree’s wise wooden face.
- Light 3: The third RM01 perched high behind the canopy with a honeycomb grid, angled down toward the camera as a rim light.
When we triggered our PMI SmokeNINJA fog machine, that third rim beam pierced straight through the drifting haze:
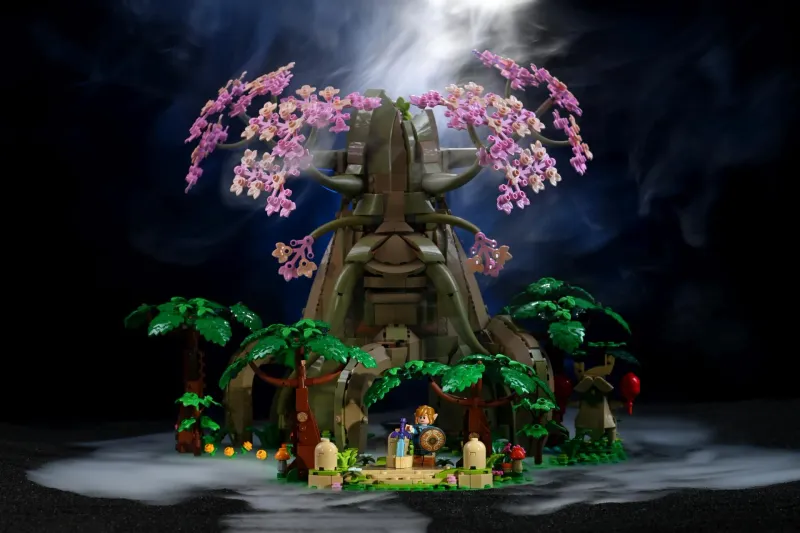
That top rim light pierced straight through the drifting haze, creating realistic, mystical god-rays streaming down into the sacred grove. You simply cannot pull that off with a bulky studio lamp — it requires a tiny, intense light source tucked precisely above the canopy.
What’s in the Box: Modifiers Galore
Most budget mini LED lights arrive with a plastic diffuser and a charging cable. SmallRig went in the completely opposite direction here. The RM01 3-Pack ships in a rugged, zippered hard case that feels like a miniature Pelican case, packed with magnetic accessories:
- 3x Silicone Dome Diffusers: The MVP modifier. Stretches over the cube face and turns harsh point-source LEDs into buttery soft fill light.
- 3x Honeycomb Grids: Snaps into the magnetic frames to constrain the beam angle to roughly 30 degrees, killing side spill.
- 3x Rubber Snoots: Funnels the light down into a tight, dramatic pencil beam. Perfect for highlighting a lightsaber, a torch, or a treasure chest.
- 3x 4-Leaf Barndoors: Traditional barn doors for cutting rectangular light slits.
- 8x Color Gel Sets: Pre-cut red, blue, green, yellow, and orange filters. We used the warm gels to simulate campfire glow and blue gels for sci-fi moonlit night shoots.
- 3x Mini Tripods & Cold Shoes: Metal mini-tripods with ball heads, plus standard 1/4”-20 threads on the bottom of every light.
Having three complete sets of modifiers means you never have to choose between diffusing your key light and spotting your backlight — each light can be dressed with whatever modifier the shot demands.
Battery Life and Practical Workflow
Each RM01 contains an 800mAh battery recharged via standard USB-C:
- Level 4 (100%): ~60 to 70 minutes of continuous runtime. The aluminum-alloy casing warms up slightly, but never gets hot to the touch.
- Level 2 (Medium): ~2.5 to 3 hours.
- Level 1 (Low): Over 4.5 hours.
In tabletop toy photography, you shoot on a sturdy tripod (like our Leofoto carbon rig) with exposures typically between 1/10s and 2 seconds at f/8 or f/11. That means you rarely need 100% power. We ran our three lights on Level 1 and Level 2 for a three-hour shooting session and finished with battery bars to spare.
If you do run a marathon studio day, the lights can be powered continuously while charging via USB-C from a standard multi-port power bank.
Weatherproofing: Ready for the Outdoors
The RM01 cubes are sealed to an IP65 rating (waterproof and dustproof). The USB-C port has a snug rubber gasket, and the physical push buttons are fully sealed membrane switches.
While our initial testing has been inside our tabletop studio, this weather sealing opens up huge creative possibilities. For our upcoming outdoor shoots — placing minifigures in real forest moss, muddy trails, or shallow mountain streams — we can submerge these lights directly in puddles or leave them in the pouring rain without frying the electronics. An outdoor field test is coming next.
Pros
- True 3-point lighting in miniature: three independent lights scale perfectly to LEGO and macro subjects
- Comprehensive magnetic modifier kit included (diffusers, honeycombs, snoots, barndoors, gels)
- IP65 waterproof and dustproof construction ready for muddy outdoor toy shoots
- Compact 38mm cubes hide behind rocks and inside LEGO architecture with ease
- Clean 5600K daylight with high CRI 95 color rendering and reliable USB-C charging
Cons
- Fixed daylight color temperature requires physical gels to change hue
- Battery lasts roughly one hour on full power (Level 4)
- No mobile app or wireless remote — adjustments require clicking the physical buttons on the back
Conclusion: The Must-Have Lighting Kit for Miniature Creators
If you photograph LEGO sets, action figures, or tabletop models, the SmallRig RM01 Mini LED Video Light Kit (3-Pack) is hands-down the best investment under $100 you can make.
Big softboxes give you light; the SmallRig RM01 gives you control. The ability to throw a tight spotlight onto a hero minifigure, softly diffuse the background architecture, and kick a sharp rim light through smoke all from three tiny, battery-powered cubes is nothing short of revolutionary for home studio work.
Coupled with a reliable fog source like the SmokeNINJA, this 3-pack elevated our toy photography from ‘plastic toys on a table’ to cinematic movie stills. A well-deserved 5 out of 5 stars.
The Final Word: Stop trying to tame giant studio softboxes for 4cm minifigures. The SmallRig RM01 3-Pack is the miniature three-point lighting toolkit every toy photographer needs in their bag.
Why are the SmallRig RM01 lights better for LEGO photography than big softboxes?
How long does the battery last on the SmallRig RM01?
Can you change the color temperature of the SmallRig RM01?
Can the SmallRig RM01 lights be used outdoors in the rain?
Keep this in your inbox
One email a week: what we actually watched, built and reviewed — the stuff worth a dad's time. No hype, no daily spam.
Dadnology Weekly
One email a week: the LEGO, gaming and movie news worth a dad's time — plus what we actually reviewed. No hype, no daily spam.
Disclaimer: This review and its visuals were created with the help of AI. Some links may be affiliate links – we may earn a commission if you make a purchase, at no extra cost to you.
You might also like

Filter Holder System vs Screw-In Filters: Why I Carry Both
Why a landscape photographer carries a 100mm holder kit AND a screw-in polarizer — what each is actually for, and when each one wins.
How to Shoot Long Exposure Water Photography (Real Settings)
The real camera settings behind 8 long-exposure water shots — from a 20-second glass-flat lake to a 1/15s waterfall, explained step by step.
Best Photography Spots in the Alps & Germany: A US Traveler's Guide
The real photography spots worth the jet lag — Alps, Dolomites, Black Forest and the Baltic coast, shot on Nikon and grouped for a US road trip.